
Wall mounting is a great way to free up space in your entertainment center while optimizing viewing angles. It can even help prevent neck strain!
Before you can begin installing your mount, it is important to understand the basics of TV mounting. This includes determining the optimal viewing distance, avoiding direct sunlight, and reserving space for components like soundbars and game consoles. For your TV Mounting needs, contact us today!
 Wall Studs
When it comes to mounting your TV, there are several options available. You can hang it on a wall that has studs, or you can use other methods to secure it to the wall without studs. Whichever method you choose, you should always be careful to follow the instructions provided by your TV mount and the manufacturer of your TV. This will ensure that you get the best results and prevent your TV from falling off or causing damage to the wall.
To mount your TV, you’ll need a few tools and some planning. First, decide where you want to mount your TV and what height you would like it to be mounted at. This can be determined by several factors, including how much space you have, how tall your ceilings are, and your personal preference. A good rule of thumb is to mount your TV so that it’s between 42 and 60 inches from the ground, but this may vary depending on your room and your personal preferences.
Next, you’ll need to locate your wall studs. The best way to do this is to use a stud finder. Move the stud finder across the wall until it indicates that you’ve found a stud. Once you’ve located a stud, mark it with a piece of tape so that you remember where it is. If you don’t have a stud finder, you can also try pulling down an electrical outlet or junction box to see if it’s attached to a stud. If it’s not, you can measure 16 inches to the left or right of the outlet to determine if there is a stud.
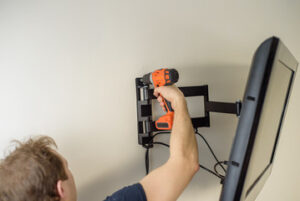
Once you’ve determined where your studs are, you can begin drilling the holes for the bolts that will hold your TV to the wall. You’ll need a drill with a drywall bit, a head screwdriver, and a level. You’ll also need to purchase a bag of heavy-duty drywall anchors.
The drywall anchors will help to keep the screws from slipping out of their holes and damaging your drywall. They’ll also keep the studs from pulling away from the wall.
Wall Plates
Whether you’re mounting your TV on the wall to free up space in a room, or because you simply prefer the look of a mounted television over a bulky console, it can be a great project. Before you get started, though, make sure your television and mount are rated to handle the weight of the TV and any components you plan on running through the wall plate. It’s also a good idea to use a level, as no one likes watching a crooked TV.
Before you start drilling into the drywall, turn off any circuit breakers that run through the area. This will prevent you from accidentally turning the power back on and causing damage to your new TV, mount, and any other components connected to it.
Once you’ve found a suitable spot, locate the TV mount attachment holes on the back of the television. These may be covered with plastic or have screws in them, so be careful when you remove them. Once you have the attachment holes uncovered, attach the mounting plate to the back of the TV and then the mounting bracket to the wall. Follow the manufacturer’s instructions for connecting these parts to make sure you’re installing your mount properly and that you don’t cause any accidental damage to your TV or wall.
Wall plates come in a variety of finishes, and are often chosen to match the rest of the décor in a room. Some plates are designed to fit specific kinds of outlets, such as outlets and rocker or slide switches, while others are meant for telephone or data jacks or are available with built-in receptacles for coaxial cables. Some plates allow you to run multiple cables through a single opening for an easy and clean installation.
To be compatible with a TV mount, your television must have the same pattern as the mount you’re installing it on. This is usually displayed in the specifications for the mount, or you can check your television’s box or manual to find out. If you do choose a compatible mount, ensure that your TV weighs less than the mount’s maximum weight capacity to avoid any damage.
Mounting Brackets
Whether you choose to hang your TV in the corner of your living room or make it the centerpiece of your home entertainment system, it’s important to ensure that the TV is mounted securely. The easiest way to do this is to use a wall mount bracket that comes with stud-finding technology. These devices can help you locate the studs in your wall and then attach the mounting plate to those studs with screws. Some wall mounts also have built-in cable management channels, which can keep your power and HDMI cords from becoming tangled or damaged as you connect or move playback devices around your home.
Some wall mounts also have adjustable tilt features, which can help reduce glare and angles. Other options include full-motion mounts, which can swivel or rotate the TV so that you can find the perfect viewing angle for your home. You’ll also want to consider how high you’re going to mount your TV. In the lounge, you’ll probably want it lower than in a bedroom or kitchen, as this will avoid getting neck strain.
Most of these types of wall mounts will come with a set of instructions that will guide you through the process of mounting your TV. It’s best to follow these steps closely as if you don’t, the whole thing could collapse. If you’re not sure that you can follow these instructions, ask someone to help you.
Before drilling into the wall, place your mounting bracket against it and use a spirit level to make sure that it’s straight. Then mark the locations of your screw or bolt holes on the wall with a pencil. You may also want to use a stud detector at this point, as some wall materials (such as brick) can be very difficult to drill into without damaging the wall or your TV.
Once you’ve marked the screw hole locations, drill each with a carbide-tipped masonry bit. These are the small holes that will allow your mounting screws to penetrate the drywall and hold the mount to the wall.
Getting Started
Besides the mount itself, you’ll need a few other items. A power drill is needed to make holes in the wall. You’ll also want a stud finder to scan the wall and mark the locations of studs. You may also want to use a standalone level, as the levels included with many wall mount kits are often cheap and less accurate. A pair of gloves and a dust mask will also help you keep the job cleaner.
Start by finding where you’d like to place the TV on the wall. This could be over a piece of furniture, in a corner, or directly above a couch. Then, figure out how high you’d like to mount it. Most people prefer to have their TV’s about eye level, which means they will be about 54 inches from the floor.
If you’re using a mount that supports articulating arms, you can usually adjust the height of the arm by loosening a screw on the back and moving it up or down. Some mounts are even adjustable vertically, allowing you to tilt the TV up and down.
Before drilling into the wall, be sure to remove any large pieces of furniture and other decor, if possible. This will make clean-up a lot easier once you’re finished. You should also make sure the wall studs are in the right places by holding your mounting plate or mounting template up against the wall and making sure the holes line up with the stud marks you drew.
When you’re ready to begin, it’s a good idea to remove the plastic covers from any ports on your TV and any other accessories, such as the HDMI, optical, or 3.5mm audio auxiliary cables. This will give you a better view of the connections as you’re running them through the walls. For most applications, you’ll need to run these cables through the wall rather than hiding them behind it.
Before starting your TV mounting business, be sure to register it with your local business license authorities. This will ensure you have the legal protections that are available in your state, and it can help to limit your liability exposure. You can choose to register as a sole proprietorship or an LLC, depending on your needs and desired level of protection.